Sharp VL-A111S Instrukcja Obsługi
Przeglądaj online lub pobierz Instrukcja Obsługi dla Kamery Sharp VL-A111S. Sharp VL-A111S Service manual Instrukcja obsługi
- Strona / 96
- Spis treści
- BOOKMARKI
- SERVICE MANUAL 1
- 1. SPECIFICATIONS 2
- 2. PART NAMES AND FUNCTION 3
- 3. DISASSEMBLY OF THE SET 4
- LZ2423H5 9
- 4. MECHANISM ADJUSTMENT 10
- 4-2-2. Notes and cautions 11
- Reel support surface 12
- Rise waveform 14
- REV OK Playback 14
- REV NG Playback 14
- 4-4-4. Adjusting the Tu guide 15
- 4-5-1. Mechanism modes 16
- 4-5-2. Cassette control ass’y 17
- 4-5-4. Drum and Drum base 17
- 4-5-5. Phase matching 18
- Insert the part in the rail 19
- 5-1. BEFORE ADJUSTMENT 21
- PROM setting 21
- 5-3-4. Setting value 22
- 5-4. TEST mode 23
- 5-6. VCR section adjustments 23
- <Extension Cable etc.> 24
- 5-6-3. VCR circuit adjustment 25
- Standard value 26
- 5-7. CAM section adjustment 29
- 300±10mVp-p(75Ω terminal) 30
- 5-7-3-9. Color adjustsment 31
- 5-8. TROUBLE SHOOTING 32
- 5-8-3. Charging mode troubles 33
- 6. BLOCK DIAGRAMS 34
- VL-A111S/H/E/AH131S/H/E 35
- VL-AH151S/H/E 35
- 6-5. LENS DRIVE BLOCK DIAGRAM 42
- - M E M O 43
- 7-5. AUDIO SCHEMATIC DIAGRAM 49
- A111 A131 50
- R4703 0 Ω NC 50
- R4704 0 Ω NC 50
- C705 NC 1000p 50
- C707 NC 1000p 50
- 7-14. TG SCHEMATIC DIAGRAM 60
- 7-19. CCD SCHEMATIC DIAGRAM 65
- VCR PWB Wiring Side SIDE A 67
- VCR PWB Wiring Side SIDE B 69
- ELECTRICAL PARTS LIST 77
- PACKAGED CIRCUITS 78
- COILS AND TRANSFORMER 78
- CAPACITORS 79
- RESISTORS 81
- CABINET PARTS LIST 88
- MECHANISM PARTS 88
- CASSETTE HOUSING PARTS 89
- CAMERA UNIT PARTS 89
- (NOT REPLACEMENT ITEM) 90
- CABINET EXPLODED VIEW 92
- CAMERA UNIT EXPLODED VIEW 93
- ALL RIGHTS RESERVED 96
Podsumowanie treści
1VL-A111S/H/E/AH131S/H/EVL-AH151S/H/EPage1. SPECIFICATIONS ...
10VL-A111S/H/E/AH131S/H/EVL-AH151S/H/E4. MECHANISM ADJUSTMENT4-1. MECHANISM CHECKING/ADJUSTING JIGS, TOOLS AND PARTS4-1-1. Mechanism checking/adjustin
11VL-A111S/H/E/AH131S/H/EVL-AH151S/H/E4-2. ITEMS AND TIMINGS OF INSPECTION AND MAINTENANCEThe mechanism of VCR needs the following periodic inspection
12VL-A111S/H/E/AH131S/H/EVL-AH151S/H/E4-3. MECHANISM CHECKS AND ADJUSTMENTSThe description given below relates to the general field services, but does
13VL-A111S/H/E/AH131S/H/EVL-AH151S/H/E4-3-4. Checking and adjusting the tension pole position(1) CheckWhen it begins to wind the P5-120 tape check whe
14VL-A111S/H/E/AH131S/H/EVL-AH151S/H/E4-4. ADJUSTMENT OF MECHANISM TAPE RUNNING SYSTEM4-4-1. Preparation for adjustmentTape running system (Figure 1)D
15VL-A111S/H/E/AH131S/H/EVL-AH151S/H/E4-4-4. Adjusting the Tu guideAfter replacement of Tu guide preset and adjust the height.(1) Tu guide height pre
16VL-A111S/H/E/AH131S/H/EVL-AH151S/H/E4-5. MECHANISM ASSEMBLING AND PARTS REPLACEMENT(DISASSEMBLING AND ASSEMBLING)Below is given an explanation of as
17VL-A111S/H/E/AH131S/H/EVL-AH151S/H/E4-5-2. Cassette control ass’y<Disassembling>(1) Set the unit to the EJECT mode, and let the housing stand
18VL-A111S/H/E/AH131S/H/EVL-AH151S/H/E4-5-5. Phase matchingThe phase of the following parts must be matched asshown in the figure below.(Ascertain tha
19VL-A111S/H/E/AH131S/H/EVL-AH151S/H/E(4) Install the loading block assembly and the capstan motor.(5) Install the drive gear. At this time, pay atten
2VL-A111S/H/E/AH131S/H/EVL-AH151S/H/ESignal System: PAL standardRecording System: 2 rotary heads, helical scanning systemCassette: A111S/H/E: 8 mm vid
20VL-A111S/H/E/AH131S/H/EVL-AH151S/H/E(8) Install the drum assembly in the chassis.(9) Install the tape guide in the drum assembly.(10) Install the Si
21VL-A111S/H/E/AH131S/H/EVL-AH151S/H/E5. ADJUSTMENT OF THE ELECTRICAL CIRCUITS5-1. BEFORE ADJUSTMENT· Electric circuit adjustment becomes necessary, i
22VL-A111S/H/E/AH131S/H/EVL-AH151S/H/E5-3-4. Setting valueTable 1) When IC705 is replacedVTR
23VL-A111S/H/E/AH131S/H/EVL-AH151S/H/E5-5. Battery shutoff voltage adjustment1) Supply power to the main unit, using the variable-voltage DC power sup
24VL-A111S/H/E/AH131S/H/EVL-AH151S/H/E16527483AV OUTDC-INAV JACKUNITMECHA UNITVCR UNITINVERTERLCD UNITCAMERAUNIT<Extension Cable etc.>1. Extensi
25VL-A111S/H/E/AH131S/H/EVL-AH151S/H/E5-6-3. VCR circuit adjustment* Before adjusting the VCR circuit, make sure that the fixed value in 5-3-2 is writ
26VL-A111S/H/E/AH131S/H/EVL-AH151S/H/EFigure 5.1.1Figure 5.1.2Mode PlaybackAdjustment address 30hTape Alignment tape (JiGWR5-5CSP)OscilloscopeMeasurin
27VL-A111S/H/E/AH131S/H/EVL-AH151S/H/E5-6-3-4. Adjustment of audio circuit1. Adjustment of filter f0Measuring instrument OscilloscopeMode PBInput sign
28VL-A111S/H/E/AH131S/H/EVL-AH151S/H/E5. VCO adjustmentMeasuring point TL3802Address(VTR ADJ) 03EMode VCRAdjusting method 1) Connect TL3803 to GND.2)
29VL-A111S/H/E/AH131S/H/EVL-AH151S/H/E5-7. CAM section adjustment5-7-1. CAM section adjustment jigs(1) Object, measuring instrument and jigs necessary
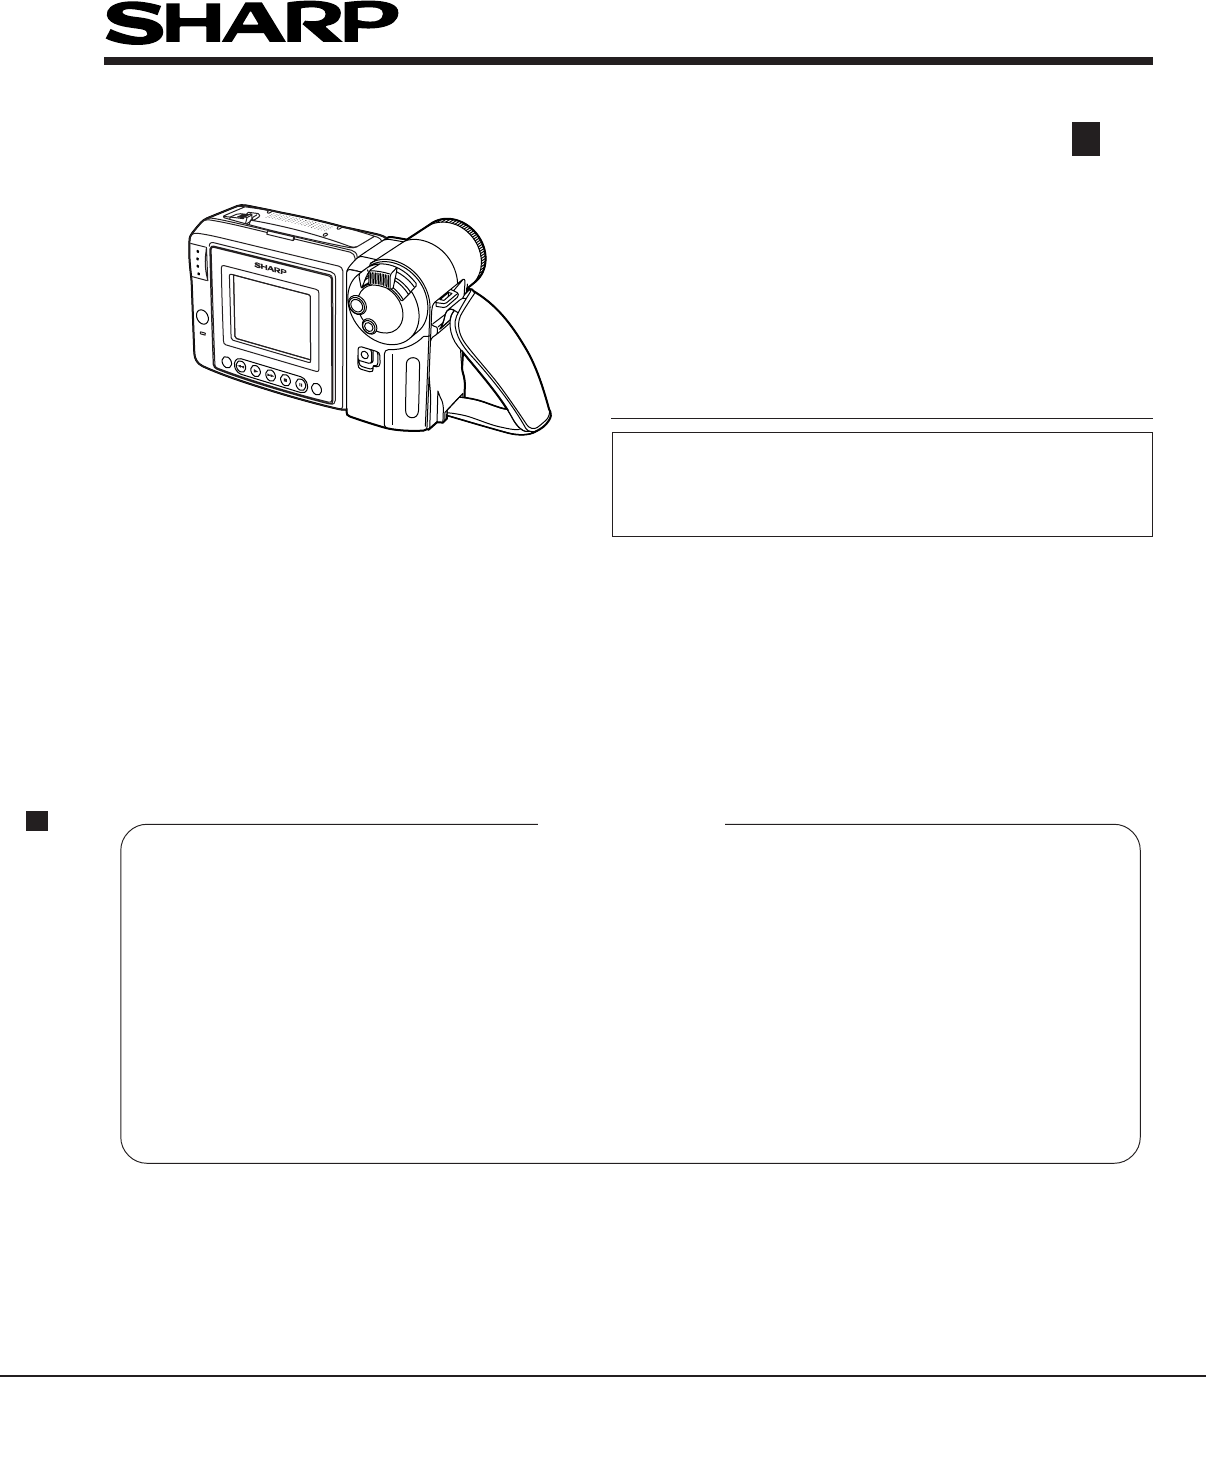
3VL-A111S/H/E/AH131S/H/EVL-AH151S/H/E2. PART NAMES AND FUNCTIONFor details on the use of each control.Front viewWhen the cassette compartment door is
30VL-A111S/H/E/AH131S/H/EVL-AH151S/H/E5-7-3-5. SYNC level adjustment1) Write ADD:70 DATA:01 and enter the lens system adjustment mode.2) Write DATA “0
31VL-A111S/H/E/AH131S/H/EVL-AH151S/H/E5-7-3-6. Black balance, AF noise level adjustment1) Write ADD:71 DATA:01.2) Press the “STOP” key to reconfirm AD
32VL-A111S/H/E/AH131S/H/EVL-AH151S/H/EûûûûûûûûûûûûûûNo operation at allYESûNo tape ejectionYESûYESNo LCD light-upCheck the inverter transformer and po
33VL-A111S/H/E/AH131S/H/EVL-AH151S/H/Eû5-8-2. Troubleshooting for the camera sectionNo pictureCheck the lens drive circuit (IC551) and main signalline
34VL-A111S/H/E/AH131S/H/EVL-AH151S/H/E* On this model, all the circuits of the VCR and camera sections are controlled by IC706.1) IC401 is controlled
35VL-A111S/H/E/AH131S/H/EVL-AH151S/H/E6-2. SIGNAL PROCESS BLOCK DIAGRAMLENSTIMINGGENERATORPANELY-FILTERBUFFERCCDSENSORV-DRIVERC-FILTERFILTEREQMIX AMPB
36VL-A111S/H/E/AH131S/H/EVL-AH151S/H/E6-2-1. RECORDING SIGNAL FLOW (VL-A111/AH131)LENSTIMINGGENERATORPANELY-FILTERBUFFERCCDSENSORV-DRIVERC-FILTERFILTE
37VL-A111S/H/E/AH131S/H/EVL-AH151S/H/E6-2-2. PLAY BACK SIGNAL FLOW (VL-A111/AH131)LENSTIMINGGENERATORPANELY-FILTERBUFFERCCDSENSORV-DRIVERC-FILTERFILTE
38VL-A111S/H/E/AH131S/H/EVL-AH151S/H/E6-2-3. RECORDING SIGNAL FLOW (VL-AH151)LENSTIMINGGENERATORPANELY-FILTERBUFFERCCDSENSORV-DRIVERC-FILTERFILTEREQMI
39VL-A111S/H/E/AH131S/H/EVL-AH151S/H/E6-2-4. PLAY BACK SIGNAL FLOW (VL-AH151)LENSTIMINGGENERATORPANELY-FILTERBUFFERCCDSENSORV-DRIVERC-FILTERFILTER EQM
4VL-A111S/H/E/AH131S/H/EVL-AH151S/H/E3. DISASSEMBLY OF THE SET3-1. REMOVAL OF THE CAMERA SECTIONNote:Before removing the cabinet, turn off the power
40VL-A111S/H/E/AH131S/H/EVL-AH151S/H/E6-3. POWER SYSTEM BLOCK DIAGRAMPower control IC (8CH)CH1 ERROR AMP.IN- Comparator sectionCH2 ERROR AMP.IN- Compa
41VL-A111S/H/E/AH131S/H/EVL-AH151S/H/E6-4. MAIN BATTERY CIRCUIT SECTION BLOCK DIAGRAMDC JACK inputVoltage detective circuitVDC<8Vwith JACK : OPENwi
42VL-A111S/H/E/AH131S/H/EVL-AH151S/H/E6-5. LENS DRIVE BLOCK DIAGRAMIC1CCD SENSOR4249IC401DSP4148IC706DATASYSTEM CONTROL16021 22 20 19212 34617 18543IC
43VL-A111S/H/E/AH131S/H/EVL-AH151S/H/E- M E M O -
VL-A111S/H/E/AH131S/H/EVL-AH151S/H/E1234567891011 12 13 14 15 16 17 18 19 20ABCDEFGHIJ44~457. SCHEMATIC DIAGRAMS 7-1. OVERALL SCHEMATIC DIAGRAMDUNTK2
VL-A111S/H/E/AH131S/H/EVL-AH151S/H/E1234567891011 12 13 14 15 16 17 18 19 20ABCDEFGHIJ46~477-2. A/D_CONVERTER SCHEMATIC DIAGRAM
VL-A111S/H/E/AH131S/H/EVL-AH151S/H/E1234567891011 12 13 14 15 16 17 18 19 20ABCDEFGHIJ7-3. ZOOM SCHEMATIC DIAGRAM(VL-AH151 only)48~49
VL-A111S/H/E/AH131S/H/EVL-AH151S/H/E1234567891011 12 13 14 15 16 17 18 19 20ABCDEFGHIJ50~517-4. DSP SCHEMATIC DIAGRAM(VL-A111/AH131)
VL-A111S/H/E/AH131S/H/EVL-AH151S/H/E1234567891011 12 13 14 15 16 17 18 19 20ABCDEFGHIJ52~537-4. DSP SCHEMATIC DIAGRAM(VL-AH151)
VL-A111S/H/E/AH131S/H/EVL-AH151S/H/E1234567891011 12 13 14 15 16 17 18 19 20ABCDEFGHIJ7-5. AUDIO SCHEMATIC DIAGRAM54~55
5VL-A111S/H/E/AH131S/H/EVL-AH151S/H/E3-2. DISASSEMBLY OF THE VCR MAIN BODY(1) Slide the “VCR lid knob” in the arrow direction, and slide theVCR lid in
VL-A111S/H/E/AH131S/H/EVL-AH151S/H/E1234567891011 12 13 14 15 16 17 18 19 20ABCDEFGHIJ56~577-6. SYSTEM CONTROL SCHEMATIC DIAGRAM(VL-A111/AH131)A111 A1
VL-A111S/H/E/AH131S/H/EVL-AH151S/H/E1234567891011 12 13 14 15 16 17 18 19 20ABCDEFGHIJ58~597-6. SYSTEM CONTROL SCHEMATIC DIAGRAM(VL-AH151)
VL-A111S/H/E/AH131S/H/EVL-AH151S/H/E1234567891011 12 13 14 15 16 17 18 19 20ABCDEFGHIJ60~617-7. LCD INTERFACE SCHEMATIC DIAGRAM
VL-A111S/H/E/AH131S/H/EVL-AH151S/H/E1234567891011 12 13 14 15 16 17 18 19 20ABCDEFGHIJ62~637-8. POWER CONTROL SCHEMATIC DIAGRAMå AND SHADED COMPONENTS
VL-A111S/H/E/AH131S/H/EVL-AH151S/H/E1234567891011 12 13 14 15 16 17 18 19 20ABCDEFGHIJ64~657-9. VIDEO OUT SCHEMATIC DIAGRAM
VL-A111S/H/E/AH131S/H/EVL-AH151S/H/E1234567891011 12 13 14 15 16 17 18 19 20ABCDEFGHIJ7-10. D/A CONVERTER SCHEMATIC DIAGRAM66~67
VL-A111S/H/E/AH131S/H/EVL-AH151S/H/E1234567891011 12 13 14 15 16 17 18 19 20ABCDEFGHIJ68~697-11. CHARGE SCHEMATIC DIAGRAMå AND SHADED COMPONENTS=SAFET
VL-A111S/H/E/AH131S/H/EVL-AH151S/H/E1234567891011 12 13 14 15 16 17 18 19 20ABCDEFGHIJ70~717-12. LCD CONTROLLER SCHEMATIC DIAGRAM
VL-A111S/H/E/AH131S/H/EVL-AH151S/H/E1234567891011 12 13 14 15 16 17 18 19 20ABCDEFGHIJ72~737-13. RF SCHEMATIC DIAGRAM(VL-A111)
VL-A111S/H/E/AH131S/H/EVL-AH151S/H/E1234567891011 12 13 14 15 16 17 18 19 20ABCDEFGHIJ74~757-13. RF SCHEMATIC DIAGRAM(VL-AH131/AH151)
6VL-A111S/H/E/AH131S/H/EVL-AH151S/H/E<3. Removal of the VCR lid>Caution for installation of the VCR lid<Detail of area B><Detail of are
VL-A111S/H/E/AH131S/H/EVL-AH151S/H/E1234567891011 12 13 14 15 16 17 18 19 20ABCDEFGHIJ76~777-14. TG SCHEMATIC DIAGRAM
VL-A111S/H/E/AH131S/H/EVL-AH151S/H/E1234567891011 12 13 14 15 16 17 18 19 20ABCDEFGHIJ78~797-15. CDS AGC/ACC SCHEMATIC DIAGRAM
VL-A111S/H/E/AH131S/H/EVL-AH151S/H/E1234567891011 12 13 14 15 16 17 18 19 20ABCDEFGHIJ80~817-16. LENS DRIVER SCHEMATIC DIAGRAM
VL-A111S/H/E/AH131S/H/EVL-AH151S/H/E1234567891011 12 13 14 15 16 17 18 19 20ABCDEFGHIJ82~837-17. HEAD AMP SCHEMATIC DIAGRAM
VL-A111S/H/E/AH131S/H/EVL-AH151S/H/E1234567891011 12 13 14 15 16 17 18 19 20ABCDEFGHIJ7-18. MOTOR DRIVER SCHEMATIC DIAGRAM84~85
VL-A111S/H/E/AH131S/H/EVL-AH151S/H/E1234567891011 12 13 14 15 16 17 18 19 20ABCDEFGHIJ7-19. CCD SCHEMATIC DIAGRAM86~87
VL-A111S/H/E/AH131S/H/EVL-AH151S/H/EABCDEFGHIJ1234567891088R1802L1800C1802L1801R1805C1803C1804C1813C1800R1811C1805R1806 R1808R1809C1807C1801R1803R1807
VL-A111S/H/E/AH131S/H/EVL-AH151S/H/EABCDEFGHIJ1234567891089VCR PWB Wiring Side SIDE A
VL-A111S/H/E/AH131S/H/EVL-AH151S/H/EABCDEFGHIJ1234567891090VCR PWB Component Side SIDE BTL701X1703CN702TL702TL703CN701Q407R434TL2715TL2713TL2714TL27
VL-A111S/H/E/AH131S/H/EVL-AH151S/H/EABCDEFGHIJ1234567891091VCR PWB Wiring Side SIDE B
7VL-A111S/H/E/AH131S/H/EVL-AH151S/H/E<8. Removal of the Lithium PWB>(b)<7. Removal of the speaker cover><6. Removal of the tilt unit>
VL-A111S/H/E/AH131S/H/EVL-AH151S/H/EABCDEFGHIJ1234567891092CAMERA PWB Component Side SIDE ASC101R17R18C19TL107TL103TL105TL104R23TL109TL108TL106C22FB
VL-A111S/H/E/AH131S/H/EVL-AH151S/H/EABCDEFGHIJ1234567891093CAMERA PWB Wiring Side SIDE A
VL-A111S/H/E/AH131S/H/EVL-AH151S/H/EABCDEFGHIJ1234567891094CAMERA PWB Component Side SIDE BTL145TL146TL144R117R116R118C560Z2C114C116R150R100C115IC10
VL-A111S/H/E/AH131S/H/EVL-AH151S/H/EABCDEFGHIJ1234567891095CAMERA PWB Wiring Side SIDE B
VL-A111S/H/E/AH131S/H/EVL-AH151S/H/EABCDEFGHIJ1234567891096HEAD AMP PWB Component Side SIDE ACN3703R390R342C344R340R343L341L342Q341C341C342C345Q342C
VL-A111S/H/E/AH131S/H/EVL-AH151S/H/EABCDEFGHIJ1234567891097HEAD AMP PWB Wiring Side SIDE A
VL-A111S/H/E/AH131S/H/EVL-AH151S/H/EABCDEFGHIJ1234567891098HEAD AMP PWB Wiring Side SIDE B
99Ref. No. Part No. ★ Description CodeRef. No. Part No. ★ Description CodeVL-A111S/H/E/AH131S/H/EVL-AH151S/H/EPRINTED WIRING BOARD ASSEMBLIES(NOT REPL
100Ref. No. Part No. ★ Description CodeRef. No. Part No. ★ Description CodeVL-A111S/H/E/AH131S/H/EVL-AH151S/H/EQ8401 VS2SA1989R/-1 2SA1989R ABQ8402 VS
101Ref. No. Part No. ★ Description CodeRef. No. Part No. ★ Description CodeVL-A111S/H/E/AH131S/H/EVL-AH151S/H/EL915 VPD9M100KR86N Peaking, 10µHACL917
8VL-A111S/H/E/AH131S/H/EVL-AH151S/H/E<11. Disassembly of the LCD panel>Light guide plateReflection sheet(C)Prism sheetDiffusion sheet1. Disengag
102Ref. No. Part No. ★ Description CodeRef. No. Part No. ★ Description CodeVL-A111S/H/E/AH131S/H/EVL-AH151S/H/EC612 VCEAPH1HW474M 0.47 50V Electrolyti
103Ref. No. Part No. ★ Description CodeRef. No. Part No. ★ Description CodeVL-A111S/H/E/AH131S/H/EVL-AH151S/H/EC7451 VCCCCZ1HH180J 18p 50V Ceramic ABC
104Ref. No. Part No. ★ Description CodeRef. No. Part No. ★ Description CodeVL-A111S/H/E/AH131S/H/EVL-AH151S/H/ER745 VRS-CZ1JF183J 18k 1/16W Metal Oxid
105Ref. No. Part No. ★ Description CodeRef. No. Part No. ★ Description CodeVL-A111S/H/E/AH131S/H/EVL-AH151S/H/ER933 VRS-CZ1JF224J 220k 1/16W Metal Oxi
106Ref. No. Part No. ★ Description CodeRef. No. Part No. ★ Description CodeVL-A111S/H/E/AH131S/H/EVL-AH151S/H/ER2923 VRS-CZ1JF823D 82k 1/16W Metal Oxi
107Ref. No. Part No. ★ Description CodeRef. No. Part No. ★ Description CodeVL-A111S/H/E/AH131S/H/EVL-AH151S/H/ER8404 VRS-CZ1JF102J 1k 1/16W Metal Oxid
108Ref. No. Part No. ★ Description CodeRef. No. Part No. ★ Description CodeVL-A111S/H/E/AH131S/H/EVL-AH151S/H/ER582 VRS-CZ1JF682J 6.8k 1/16W Metal Oxi
109Ref. No. Part No. ★ Description CodeRef. No. Part No. ★ Description CodeVL-A111S/H/E/AH131S/H/EVL-AH151S/H/EC324 VCKYCZ1AB104K 0.1 10V Ceramic ABC3
110Ref. No. Part No. ★ Description CodeRef. No. Part No. ★ Description CodeVL-A111S/H/E/AH131S/H/EVL-AH151S/H/E379 PSLDM0118GEFW Shield Angle(A111S/H/
111Ref. No. Part No. ★ Description CodeRef. No. Part No. ★ Description CodeVL-A111S/H/E/AH131S/H/EVL-AH151S/H/E6-12 LHLDZ1445TAZZ Lens Holder AD6-13 L
9VL-A111S/H/E/AH131S/H/EVL-AH151S/H/E3-3-2. REMOVAL OF CCD1) Unsolder the CCD sensor leads from the sensor PWB.2) Take out the sensor PWB.3) Remove th
112Ref. No. Part No. ★ Description CodeRef. No. Part No. ★ Description CodeVL-A111S/H/E/AH131S/H/EVL-AH151S/H/ESUPPLIED ACCESSORIESACCESSORIESGCOVH129
113Ref. No. Part No. ★ Description CodeRef. No. Part No. ★ Description CodeVL-A111S/H/E/AH131S/H/EVL-AH151S/H/EMECHANISM CHASSIS EXPLODED VIEWABCDEFGH
114Ref. No. Part No. ★ Description CodeRef. No. Part No. ★ Description CodeVL-A111S/H/E/AH131S/H/EVL-AH151S/H/EABCDEFGH123456CABINET EXPLODED VIEW33-2
115Ref. No. Part No. ★ Description CodeRef. No. Part No. ★ Description CodeVL-A111S/H/E/AH131S/H/EVL-AH151S/H/ECASSETTE HOUSING CONTROL UNIT EXPLODED
116Ref. No. Part No. ★ Description CodeRef. No. Part No. ★ Description CodeVL-A111S/H/E/AH131S/H/EVL-AH151S/H/E10. PACKING OF THE SETACCESSORIESNo. Mo
117Ref. No. Part No. ★ Description CodeRef. No. Part No. ★ Description CodeVL-A111S/H/E/AH131S/H/EVL-AH151S/H/E
118Ref. No. Part No. ★ Description CodeRef. No. Part No. ★ Description CodeVL-A111S/H/E/AH131S/H/EVL-AH151S/H/ESHARP CORPORATIONAV Systems GroupQualit
Więcej dokumentów dla Kamery Sharp VL-A111S

Powiązane produkty i podręczniki dla Kamery Sharp VL-A111S
 (72 strony)
(136 strony)
(120 strony)
(72 strony)
(136 strony)
(120 strony)
 (63 strony)
(112 strony)
(63 strony)
(112 strony)
 (49 strony)
(129 strony)
(49 strony)
(129 strony)
 (67 strony)
(72 strony)
(75 strony)
(67 strony)
(96 strony)
(172 strony)
(91 strony)
(80 strony)
(72 strony)
(140 strony)
(123 strony)
(76 strony)
(67 strony)
(72 strony)
(75 strony)
(67 strony)
(96 strony)
(172 strony)
(91 strony)
(80 strony)
(72 strony)
(140 strony)
(123 strony)
(76 strony)
© 2020, manymanuals.pl. Wszelkie prawa zastrzeżone. | 0.033 s |
 Manymanuals.com
 Manymanuals.de
 Manymanuals.fr
 Manymanuals.it
 Manymanuals.pl
 Manymanuals.cz
 Manymanuals.es
 Manymanuals-pt.com
Komentarze do niniejszej Instrukcji